Tuesday, September 16, 2008
How about candy for breakfast?
Why, I'd love some! But, since chocolate isn't really a breakfast item (unless it's covering donuts or in the form of chocolate gravy that my BIL makes so well), I think I'll try THIS. You can, too...just follow that link. Good luck!


Wednesday, September 10, 2008
Wanna Win a Cricut Expression?
How would you like to win a Cricut Expression? If so, check out this post on The Secret is in the Sauce. All you need to do is add their blog button to your sidebar (a requirement of the give-away) and leave a comment in the post that I linked earlier. You can enter once each day by visiting their blog and commenting. If you also post on your blog about the contest and link back to SITS, you'll get 5 extra entries! Good luck. :)
Wednesday, August 20, 2008
Di Hickman: Card Sketch August #3
Di Hickman: Card Sketch August #3
As I was reading the various blogs I subscribe to, I came to this card sketch on Di Hickman's blog:
.jpg) Credits:
Credits:
Digital Template ~ Di Hickman
Digital Sentiment PNG ~ Creative Memories
Digital papers ~ Starburst from Digital Freebies
Digital embellishments ~ Annie's Room, BabyCafe MegaCollab Kit, Raspberry Road Tool Box Kit, Refresh Collection, Raspberry Road Lovebirds
Created using StoryBook Creator Plus by Creative Memories
As I was reading the various blogs I subscribe to, I came to this card sketch on Di Hickman's blog:
I've been slacking on working on my albums since I started card-making, and when I saw this sketch, as much as I wanted to go upstairs and make a card, I feel crappy because of a sinus infection. So, why am I telling you all this then? Because I created a digital scrapbook page using her sketch! Whaddaya think?
Credits:Digital Template ~ Di Hickman
Digital Sentiment PNG ~ Creative Memories
Digital papers ~ Starburst from Digital Freebies
Digital embellishments ~ Annie's Room, BabyCafe MegaCollab Kit, Raspberry Road Tool Box Kit, Refresh Collection, Raspberry Road Lovebirds
Created using StoryBook Creator Plus by Creative Memories
Thanks for stopping by!
Sunday, August 10, 2008
Gift Set for a Happy Birthday
One of my best friends had a birthday waaaaaaaaay back in May. There's a reason I'm just now posting her gift....it's called "brain farts". ;)~ Everyone who knows me knows that I have memory issues....it's relatively new, so I hope everyone, including the birthday girl!, understands and loves me anyway!
When Shannon saw some cards I made before, she "kinda" hinted that she would like some. I decided then that I would come up with a set for her birthday. I knew she liked pink and brown, so I went with those dee-lish colors....I mean, what girl doesn't love pink and brown?!?!?!?
**Please click on the pictures to enlarge.**
I made the box using my Scor-Pal. It was relatively easy.

Here are a couple of pictures of the cards. I made 6 cards/envies, using a different Cuttlebug embossing folder on the large brown mat to help give each on a different texture. To stamp the monogram, I used the StampRite Monogram stamper, Curly font.
When Shannon saw some cards I made before, she "kinda" hinted that she would like some. I decided then that I would come up with a set for her birthday. I knew she liked pink and brown, so I went with those dee-lish colors....I mean, what girl doesn't love pink and brown?!?!?!?
**Please click on the pictures to enlarge.**
I made the box using my Scor-Pal. It was relatively easy.

Here are a couple of pictures of the cards. I made 6 cards/envies, using a different Cuttlebug embossing folder on the large brown mat to help give each on a different texture. To stamp the monogram, I used the StampRite Monogram stamper, Curly font.


Even though I don't have pictures, I also made a couple of other things for her. One of them was a giant clothespin from Michael's. I painted it with some chocolate distress paint and attached a large fancy Prima flower and some ribbon onto one side...I hope that she'll use it as a photo or memo holder. I also "fancied" up a Pentel RSVP to use with her note cards. I unscrewed the end and pulled out the ink reservoir, wrapped it with some matching paper that was cut it the length of the area between the black rubber gripper and the black on the end of the pen. I also used some of the ribbon that was used on the bag, plus some Basic Gray fibers, to tie onto the cap of the pen. I sooooo wish I had taken a picture!
***Please note that if you are interested in a set of cards similar to this, just email me at jowen214ATyahooDOTcom. I can play around with various papers, but a set like this would be $25 plus shipping. I take PAYPAL only.***
Stamps: JustRite Monogram Stamper w/Curly font
Paper: Creative Memories Romance papers; Creative Memories white card stock
Assessories: Prima flower; We R Memory Keepers rhinestone brad; Swiss Dots & Textiles Cuttlebug Embossing Folders; Cricut Expression & Design Studio; Creative Memories mini flower punch; Creative Memories photo tape.
Wednesday, July 2, 2008
Hoot, hoot...
I made this card yesterday for a dear friend who had surgery, a breast reduction. I have loved this owl from the Cricut Happily Ever After cartridge ever since I saw someone post a card made with it. I finally got it and this, of course, was the first image I used from it!
 The printed paper and the green paper are Basic Gray Sultry, and the pink and brown papers are Bazzil. The brown grosgrain ribbon was bought from Taylored Expressions. The pink & green ribbon is from the dollar spot at Target. The brads are from a package of pearlized mini brads that I got from Stamper's Dream. The white dots and faux stitching were made with my white Signo pen. The card base was cut using my design studio and a cut file from Capadia Designs.
 I just couldn't resist this caption inside! Very appropriate, huh? ;) The owl stamps here on the inside are from Hero Arts, stamped with white pigment ink and then heat embossed. It's going out tomorrow, and I can't wait for her to get it.
 The printed paper and the green paper are Basic Gray Sultry, and the pink and brown papers are Bazzil. The brown grosgrain ribbon was bought from Taylored Expressions. The pink & green ribbon is from the dollar spot at Target. The brads are from a package of pearlized mini brads that I got from Stamper's Dream. The white dots and faux stitching were made with my white Signo pen. The card base was cut using my design studio and a cut file from Capadia Designs.
 I just couldn't resist this caption inside! Very appropriate, huh? ;) The owl stamps here on the inside are from Hero Arts, stamped with white pigment ink and then heat embossed. It's going out tomorrow, and I can't wait for her to get it.
Thanks for stopping by!
Sunday, June 29, 2008
Been Gone Too Long!
Lots to post since last time! I'm still busy receiving cards from members of the Cricut message board for the St. Jude Cards for Kids project. Several ladies and I will be delivering nearly 7,000 (as of right now...I'm still getting cards in the mail!) to the hospital. Some for the families of children being treated there....and some that will be sold in the gift shop---the money made from these will go toward research at St. Jude. I am so excited to be a part of this! The day we deliver the cards, we are going to discuss this being an ongoing project.


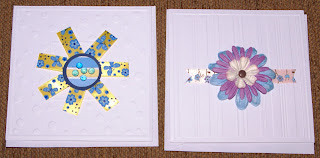


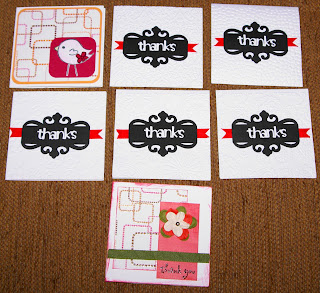
Here are some other cards I've done since my last post:


Father's Day card for my husband...I saw some cards like this on the gallery at Splitcoast Stampers that used stamps. I love the idea of a card like this for a Father's Day card, but I did not have any stamps like that. So, I took to the "drawing board"...or rather, my Design Studio. Using D.S. and the George cartridge, I created these ties. This paper from the Basic Gray Boxer 6x6 pad were PERFECT for ties! It's simple, but I love it. Here is the cut file: FATHER'S DAY TIES


I've got a few more cards that I made for this project:
Here are some other cards I've done since my last post:
Mother's Day for my mom. For the main panel, I used a piece of printed paper from DCWV All Dressed Up Mat Stack. The scalloped and plain circles were cut using Mini Monograms and my Expression machine. The "D" and "Donna" was cut from Jasmine. Flowers are Prima...the black one started out white! I needed a black one but didn't have the correct size, so I used my BIC marker and colored it black! White dots on each scallop were done using a white Singo uniball pen.
Birthday card for my dad. Printed paper is Basic Gray Archaic, as well as the smaller green panel. Both of these are mounted on a deep brown Bazzil cardstock. The dinosaur was made by cutting a small dino out of another piece of the B.G. Archaic, enlarging it on the copier, and then tracing that onto the orange B.G. Archaic. I added rain dots to the lower left corner of the smaller panel, after coloring them with an orange BIC marker. I know that dinosaurs seem like a card for little boys, but as soon as I saw the paper, I immediately thought of a great sentiment for the inside.... "glad you're not extinct". :)
Father's Day card for my husband...I saw some cards like this on the gallery at Splitcoast Stampers that used stamps. I love the idea of a card like this for a Father's Day card, but I did not have any stamps like that. So, I took to the "drawing board"...or rather, my Design Studio. Using D.S. and the George cartridge, I created these ties. This paper from the Basic Gray Boxer 6x6 pad were PERFECT for ties! It's simple, but I love it. Here is the cut file: FATHER'S DAY TIES
Father's Day cards for my dad, my husband's dad, and my husbands step-father....all are the same. I figured I'd make it easy on myself since I had 3 to make. I also got this idea from Splitcoast Stampers. There, someone used a folding template. I used my Design Studio and George cartridge! Printed paper is from Basic Gray. Here is the cut file for the shirts: FATHER'S DAY SHIRTS
Here's a birthday card for one of my daughter's friends....
And a tag I made to add to the gift of my next-door neighbor's little boy....they were having a Happy Feet themed party, so I thought I'd carry the theme on with the tag. Printed paper is by Arctic Frog.
As soon as I figure out how to add cut file for Design Studio to my blog, I'll come back and add them. Thanks for looking!
Tuesday, May 27, 2008
A Couple of Quick Cards
I went upstairs for a few minutes earlier tonight to work on some cards for the St. Jude project. I decided to come up with some simple but cute ones so that I can "mass produce" and get more done. Here, I used Design Studio to create some 4x4 cards and envelopes to fit. Actually, I used Design Studio for the entire project. I have found that I never use the machine by itself anymore. It's just so much easier to get things the desired size when using Design Studio!
 The scalloped mats are from Mini Monograms, the butterfly from New Arrivals, the little birdie from Stretch Your Imagination, and the "hi" is from Opposites Attract. I ran the front side of the cards through my Cuttlebug using the Swiss Dots embossing folder. The inside of the cards were left blank so the families who get these cards can use them for any purpose they choose.
Before you go, please check out the following links related to this project:
Press Release About St. Jude Cards for Kids
St. Jude Children's Research Hospital
Thanks for stopping by!
Sunday, May 25, 2008
Birthday Card for my Husband
My husband's birthday was yesterday. He loves golf, so I made the card below for him. I used THIS CARD for my inspiration. I got the printed paper at Archiver's Friday (along with a TON of other stuff!) during a shopping spree with my friend Sharon. I used my Cricut Expression, Design Studio, and George and Plantin Schoolbook cartridges for the words.


I wrapped my husband's present in brown craft paper, using twine instead of ribbon. I made the tag by cutting a circle of chipboard out with my Cricut Expression, as well as the white paper that I used for the golf ball and the "grass". The golf ball was run through my Cuttlebug to get embossed and then I inked it. I stole one of my husband's golf tees (hey, he left it lying on the kitchen counter, so it was there for the taking! Heehee!), cut off part of it to the correct length using some wire cutters, and adhered it to the tag using Ranger's Glossy Accents. I CASED THIS CARD for my tag.


Thanks for stopping by! I hope you enjoy the long Memorial Day weekend!
One Last Teacher Gift---A Card Set
Here's a set of cards that I made as one more gift for my daugher's teacher. Several of these cards were "CASED" from other blogs....I wish I had 1/4 of the creativity that some of those ladies do!

First is the little box I made for storing the cards. The flowers and butterflies were cut with my Cricut Expressions machine. Flowers were cut out of white cardstock and the edges inked. I used the border feature on Walk In My Garden for these. The butterflies were first cut in shadow out of white cardstock, inked on the edges, and stuck down. The top layer of butterflies were cut out of various Creative Memories Printed Paper. I decorated both sides of the box this way.

First is the little box I made for storing the cards. The flowers and butterflies were cut with my Cricut Expressions machine. Flowers were cut out of white cardstock and the edges inked. I used the border feature on Walk In My Garden for these. The butterflies were first cut in shadow out of white cardstock, inked on the edges, and stuck down. The top layer of butterflies were cut out of various Creative Memories Printed Paper. I decorated both sides of the box this way.
 This first card uses paper from the Basic Gray Sugared 6x6 pad. I used printed paper as the background and a strip of solid (distressed) paper from the same pack across the middle of the paper. The scalloped circle was cut using my Cricut Expression and Design Studio, as was the the inside circle. Flowers are Primas, fastened to the lighter paper using a clear rhinestone brad. I know, you're thinking to yourself, "that doesn't look like a clear rhinestone brad!". :) It is, but it's topped with a "skittle". These little gems are being raved about all over the Cricut message boards. I found my CLEAR ones at Michael's....Yes, this pink "skittle" started out clear! I just colored the flat bottom using my BIC markers. It was then attached to the top of the brad using Ranger Glossy Accents. I love the dimension it added. (This card was CASED, but I can't find the blog user who first created it.)
 This card was created using scraps from my Basic Gray 6x6 pad of Sultry and some scraps of Bazzill. The birds (Stampin' Up "A Little Birdie Told Me") were stamped onto white cardstock and cut out. Then I colored them using my colored pencils and then I went over that using a Goo-Gone Pen....Yes, Goo-Gone is not just for getting rid of goo! I read on Splitcoast Stampers that some ladies were using a Goo-Gone pen for blending their colored pencils instead of Gamsol or Baby Oil Gel. I had tried the Baby Oil Gel before and didn't have much luck with it, even after several tries. I got it the first time with the Goo-Gone pen. I based this design on a card that I saw HERE.
 More Sultry paper here. I so love the bright colors from this pack! This is one of the few design I came up with on my on. (shocker!) Prima flowers are secured to the ribbon using a clear rhinestone brad. I used my Cricut Expression machine and the Walk In My Garden cartridge to cut the butterflies in pink and green Bazzil cardstock. See the round accents on the wings of each butterfly? Those are CLEAR Rain Dots that I colored with my BIC markers. You would not believe how excited I was after seeing how good these looked after coloring them.
 Here's another of my own designs. I used DCWV cardstock as the base after running it through my cuttlebug to dry emboss it. The printed paper is from DCWV All Dressed Up Mat Stack. The green embem was cut using my Cricut Expression and the Home Accents cartridge. The "W" monogram was cut from the Jasmine cartridge. Everything was then inked with black ink.

Another one of my ideas, using all the same paper as noted in the above paragraph. In this card, I used a corner ticket punch on the green paper and printed paper. White eyelets were then put in all four corners of the black cardstock. Flowers are Prima and attached to the printed paper with a clear rhinestone brad. The black flower in the center started out white! I wanted to use a black flower in the center, but I did not have one in the size I needed. So, I took a white one and colored it black using my BIC markers!
 I love this card, too! Check out THIS BLOG for my inspiration for this card. I ran the pink paper through my Cuttlebug. The printed paper is from Imaginisce. The flower petals are ovals cut using my Cricut Expression and the George Cartridge. The green accents in the center of the flower are clear Rain Dots that I once again colored with my BIC markers. The square "button" is chipboard and the Imaginisce paper that I cut out using my Cricut Expression, Design Studio and the George cartridge. Then, I punched two holes using my Crop-o-Dile and tied various ribbons on it for added dimension. The stamped image is a small border from Studio G clear stamps.
 THIS BLOG is so full of beautiful ideas, and it's where I found a card to base the one above on. All paper is from the We R Memory Keepers Silver Lining collection. I did not have the stamp used in the original card, so I used my Cricut Expression and the Joys of the Season cartridge.
 The card I chose to case for the one above is by The Stamping Addict. Her flower image and stem are stamped, and I did not have anything that I liked to use in this spot, so I used my Cricut Expression to cut out several different sized flowers and a stem. I layered the flowers and attached them using a gold mini brad. The light colored paper at the bottom of the card front was a scrap of Basic Gray that had been stamped using Stampin' Up's French Script backgrounder.
 This card was also CASED, but I am unable to find who came up with the original. Design paper is by Basic Gray, all cardstock is Bazzil and DCWV. Flowers are Primas and ribbon came from Michael's dollar bin.
Thanks so much for stopping by!
Saturday, May 10, 2008
Mother's Day Cards & Link to Some iCandy
I was a busy bee last night. Nothing like waiting till the last minute, but I got my 3 Mother's Day cards done. Well, I already had one but had to make the other two. I'm only going to post two....one because my MIL already has hers & the other because I don't think she'll see it here before she gets it. I'm not posting my mom's because there's a slight chance she might see it here, and I don't want her to see it till I give it to her.


Here's the first:

I started with a base of chocolate colored Bazzil cardstock to create this card. Next is paper from the Basic Gray Infuse 6x6 paper pad. The ribbon is also Basic Gray Infuse. I covered a piece of Maya Road chipboard with more BG and then stamped and embossed the sentiment. The small flower was add there because I got the sentiment off center. :) I used my new Cricut Home Accents Solutions cartridge and design studio to cut the flourish and welded "mom" to it using Jasmine. The flowers were stamped onto more BG Infuse using Stampin' Up Boho Blossoms. I stamped two of the large flowers, cut them apart and did some layering to add some dimension. The small flowers are also from SU Boho Blossoms, but I punched them out using a SU punch.

Inside, I used a pretty green Bazzil cardstock for the letters that I cut out using Cricut Design Studio and Alphalicious (love that cart for fonts!). More Boho flowers stamped and punched out. The tag was cut using Tags, Bags, Boxes, and More....I used another SU stamp on it....ribbon is Basic Gray.

My second card also features stamps from Stampin' Up. The sentiment is from "The Art of Life---I stamped and then embossed it, making it so shiny that getting a good picture was impossible. The main stamped image is Avian Toile by Stampin' Up, colored with my makers. All paper is Creative Memories cardstock. The decorative corners were made using my Cuttlebug.

For the inside sentiment, I used Cricut Design Studio and the Alphalicious cartridge to weld and cut the letters. The tag and it's envelope were cut using TBBM. Ribbon is from Michael's. The flowers were stamped using Stampin' Up's The Art of Life. I stamped the image using VersaMark and the embossed with clear embossing powder. A clear "skittle" was placed in the center of one and clear Stickles in the other.
Since I started card-making, I've found many, many blogs that offer much inspiration and instructions. One that I subscribe to is iSTAMP , and I just love her creativity. Obviously, many others do, too, because she has reached 200,000 hits on her blog!!! To celebrate, she is offering some awesome blog candy. If you're interested in the chance to win some free stampin' stuff, be sure to visit her blog.
Thanks for stopping by! Happy Mother's Day.
Subscribe to:
Posts (Atom)


 Posts
Posts